
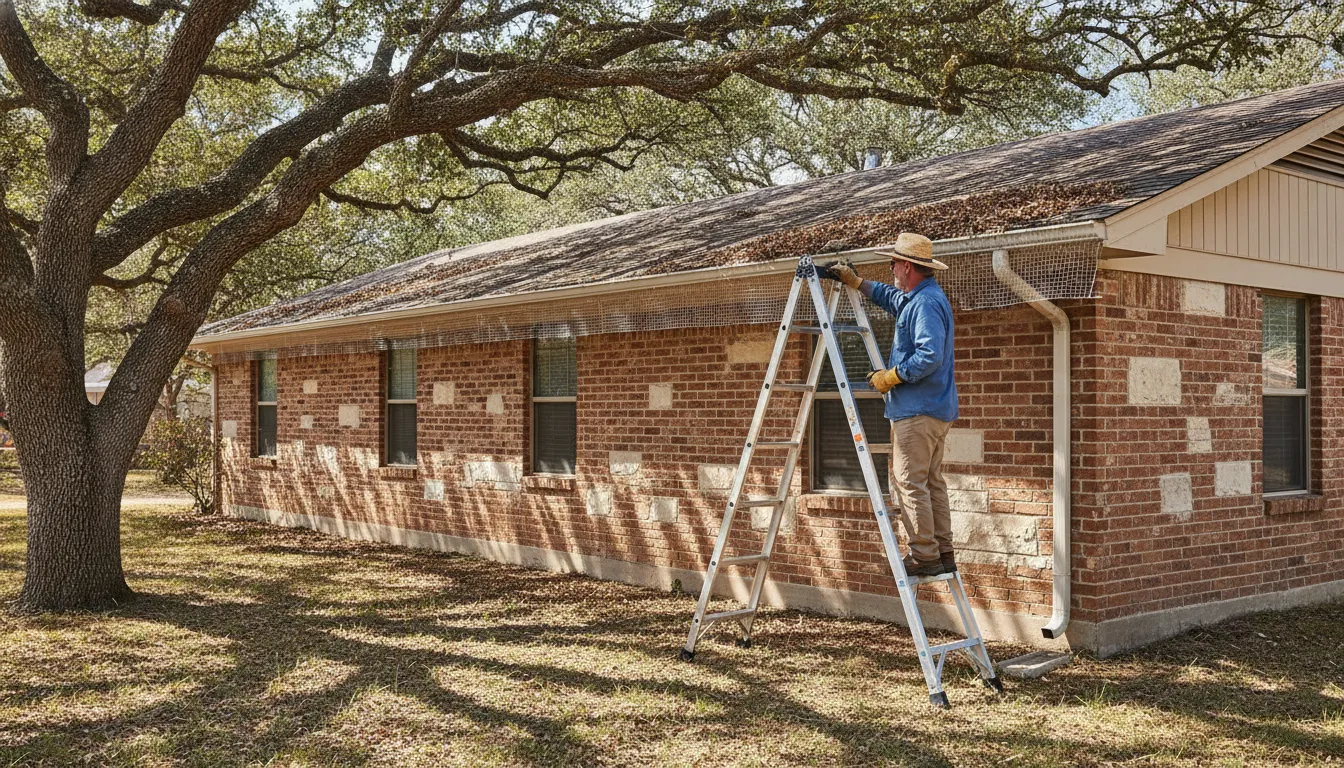
Gutter guards keep much of the leaf litter out, but Central Texas weather still leaves behind pollen, fine grit, and wet leaf paste. Live oak and pecan debris can collect on top of the guard, while smaller material may reach the gutter beneath it.
See gutter cleaning and leaf protection.
To learn how to clean gutters with gutter guards, clear the guard surface with a brush or blower first. Then rinse from the roof side so water can pass through the openings. Check the downspout without forcing a fastened panel loose. Stop when the roof is steep, the gutter is on a second story, or removing the guard could damage the system.
The right approach depends on the guard style and on what the water is doing. A surface that looks clear can still hide a blocked trough, so the next step is to understand what changes when guards are already on the gutter.
What Changes When Guards Are Already On
Gutter guards change the job, but they do not eliminate it. A guard keeps larger leaves and other bulky debris from dropping directly into the trough. It can still collect material across its top, however, and fine particles may pass through its openings. In Central Texas, that can include live oak leaves, pecan litter, pollen, grit, and wet leaf paste after rain. The result is usually less scooping from an open gutter and more attention to the surface where debris gathers.
When learning how to clean gutters with gutter guards, start by looking at the guard itself. A soft brush can lift dry leaves and loose grit without forcing debris into the openings. A low-pressure rinse from the roof side toward the gutter can wash finer material toward the drainage path. The exact approach depends on the guard design. Screen guards can generally be brushed, while micro-mesh needs a gentler touch. Reverse-curve covers need attention along the nose and at any visible gaps. Foam or brush inserts may need to be removed before debris can be cleared from the trough.
Do not remove a fastened panel simply to inspect underneath it. Look below the guard when water sheets over the edge, a section is loose, or the downspout will not flush. Forcing a secured panel can bend it or create a gap that lets more debris enter. If the surface is clear, flush the downspout from the outlet upward when practical and confirm that water exits away from the foundation. Overflow that continues after the top is clean points to a deeper blockage, a drainage issue, or a problem with the gutter system.
That is why no guard system is maintenance-free. Guards reduce the amount of debris that reaches the trough, but Central Texas trees and seasonal conditions still leave material on the system. The maintenance may be simpler and more surface-focused, yet it remains part of keeping water moving. For a broader look at gutter guard benefits and limits, see the related guide. Stop if a guard is tucked under the first shingle course. Also stop if the roof is steep or wet, the gutter sags, or water still overflows after the surface is clean. Have that system evaluated rather than forcing the job.
How to Clean Gutters With Gutter Guards by Style
Learning how to clean gutters with gutter guards starts with recognizing that a guard reduces what enters the trough but does not prevent surface buildup. Fine grit, pollen, and wet leaf paste can collect on top, while debris may still pass through openings. The right cleaning motion depends on the guard style.
| Guard style. | Where debris sits. | Cleaning motion. | When to stop. |
|---|---|---|---|
| Micro-mesh | Debris sits on the mesh and at the frame edges. | Use a soft brush, then a low-pressure rinse from the roof side. | Stop if the mesh is damaged or water still sheets over the edge. |
| Screen or perforated | Debris sits across the screen and around the openings. | Brush across the surface, then rinse through the openings. | Stop if a panel shifts, bends, or stays blocked below. |
| Reverse-curve hood | Debris sits along the nose, the channels, and the end caps. | Clear the nose gently and check for gaps or trapped debris. | Stop if the hood is loose or water misses the trough. |
| Foam or brush insert | Debris sits in the insert and in the trough beneath it. | Lift the insert only if it pulls free, then scoop the trough. | Stop if the insert is stuck or the gutter is sagging. |
Rinsing is a test as much as a finishing step. If water backs up, spills over the front edge, or fails to reach the outlet, debris may be sitting below the guard. Do not assume a clean-looking surface means the channel is clear. A little buildup at a seam or downspout entrance can interrupt flow during the next heavy rain.
Use this sequence for any style:
- Walk around the property from the ground and note overflow stains, damp areas, or places where water has been splashing.
- Clear leaves and loose material from the guard with a soft brush or leaf blower. Stay off the roof if you can.
- Rinse from the high side, near the roof, so water enters the guard openings instead of running away from the gutter.
- Watch the downspout outlet while water runs. A clear outlet should discharge water and move it away from the foundation.
- Only lift a panel if it is already loose or water still sheets over the edge after the surface is clear. Never pressure-wash mesh, and do not pry a guard tucked under shingles.
- Reset any lifted panel so it sits securely with no gap at the roof edge.
Stop and call a professional for a second-story or steep, wet roof, a sagging gutter. A guard fastened under the first shingle course, or overflow that continues after cleaning. For help with gutter cleaning and leaf protection, TX Gutter Solutions can assess the guard and drainage system without recommending a one-size-fits-all product.
A Ground-Level Pass Before You Climb
Most of what you need to know shows up from the yard. Walk the house after a dry day, then again during or just after a normal rain if you can stay off the ladder. You are looking for where water leaves the system, not for a perfect roofline.
Start at the downspout outlets. A clear run drops water out of the elbow and sends it across the splash block or into an extension, away from the slab. Mud, seedling plants, or a fan of grit at the outlet means material has already passed the guard and settled where the pipe narrows. That is a flush job, not a reason to peel the guard off the whole house.
Next, read the siding and the fascia. A dark streak under one corner usually means that spot overflowed more than once. A chalky line on brick can be the same clue after it dries. Sagging between hangers, a gutter pulling off the board, or a guard edge that sticks up into the shingle line are repair problems. Brushing those spots will not put the slope back.
Inside corners and roof valleys deserve a longer look. Two roof planes dump their runoff into one short stretch of guard, so oak leaves and pecan litter stack there first. If you can see a mat on the mesh from the ground, that is the first place to brush. End caps and the short piece over a porch are the other usual piles, because wind drops debris where the run stops.
Write down the corners that overflow and the outlets that look dirty. That list is the whole work plan. You move the ladder only to those spots, you brush only the surface. And you stop when the list is clear or when a spot needs a panel lifted. Guessing your way around the whole eave is how a one-hour job turns into a damaged guard.
Brush, Blow, and Rinse Without Forcing Debris Through
Dry debris comes off easier than wet paste. If the forecast gives you a dry morning, do the brushing then. A soft hand brush or a push broom with the bristles turned up will lift whole leaves off micro-mesh and screen. Work along the guard, toward a downspout, so you are not packing a pile into a corner that has nowhere to go.
A leaf blower is useful only from the ground, and only when the eave is low enough that the air actually reaches the guard. Aim across the surface, not straight down into the openings. A hard blast downward drives seed and grit through the mesh and into the trough you were trying to protect. The same rule applies to the hose. Use a gentle shower from the roof side of the guard so water falls through the openings the way rain does. A jet from the yard, aimed up under the front lip, mostly wets the siding.
Give each section a few feet, then look at the outlet before you move the ladder. If water reaches the outlet and keeps moving away from the foundation, that run is done. If water rises on the mesh and spills over the front lip, stop rinsing. More water will not push a packed downspout clear, and it can overflow behind the fascia while you are still on the ladder.
Wet leaf paste needs the brush first. Rinsing it immediately smears it into the holes. Lift the film with the brush, drop it in a bucket or onto the ground away from the outlet, then rinse. On a reverse-curve hood, stay on the nose and the end caps. Do not try to spray up into the slot where water is supposed to curve into the trough. On foam or a brush insert, rinse will not clean the trough underneath. Those inserts have to come out, and only when they pull free without tools.
Downspouts, Corners, and the Flush Test
The downspout is where a guarded gutter usually fails after the top looks fine. Fine grit that passed the mesh settles in the elbow, the first bend, and any buried extension. A surface rinse never touches that.
Disconnect the bottom elbow if it slips off by hand. Have a bucket ready. Run the hose into the opening at the top of the downspout. Or into the outlet from below if that is the only reach you have, and watch what comes out. Clear water after a short burst of sand means the pipe was the clog. A slow dribble, or water that backs up onto the guard, means the blockage is higher. In the trough under the guard or in a corner the brush never reached.
Do the corners next. A valley can drop a season of pollen and oak tassels into two feet of gutter. If the panel over that corner unclips, lift just that piece. Scoop the trough with a small plastic scoop, and check that the gutter still slopes toward the outlet. Then seat the panel so the roof-edge side has no gap. A gap there lets the next storm pour behind the gutter instead of into it.
Finish with one flush of the whole run you worked on. Water should enter the guard, travel to the outlet, and leave the house. If it pools beside the slab, the cleaning worked and the drainage extension did not. That is a separate fix, and it matters in Austin, San Antonio, and Dallas-Fort Worth, where a hard rain on dry ground still finds a foundation. Note it, and do not keep washing the guard hoping the puddle will move.
Tools and Ladder Safety Before You Start
Before you learn how to clean gutters with gutter guards, gather tools that let you work from a stable position and avoid damaging the guard. You will typically need a ladder rated for your weight plus the tools you will carry, a soft brush or push broom, a bucket, gloves, and eye protection. A garden hose with a gentle nozzle helps rinse away loosened debris without unnecessary force. If the eave is low enough to reach safely from the ground. A leaf blower can clear loose leaves from the guard surface without putting you on a ladder.
Choose the tool that fits the debris and the guard. A soft brush is useful for surface buildup, while a gentle rinse can move fine material toward the openings. Guards reduce what falls into the trough, but fine grit, pollen, and wet leaf paste can still collect on top or pass through. Avoid prying up a fastened panel just to inspect underneath. Look below the guard only when water sheets over the edge, a section is already loose, or the downspout will not flush.
Use the ladder conservatively
Set the ladder on stable, level ground before climbing. Keep three points of contact, face the ladder, and stay near the middle rather than leaning out to reach another section. Never stand on the top cap or the top step of a stepladder. The OSHA ladder safety guidance provides these basic precautions and is worth reviewing before you begin.
Move the ladder instead of stretching sideways. Keep your bucket and tools light enough to control, and wear eye protection when brushing or rinsing debris overhead. If the ground is soft, sloped, wet, or otherwise unstable, stop and correct the setup before you continue. A ladder that shifts can turn a routine maintenance job into a serious fall.
Some conditions are a stop point, not a DIY project: a second story, a steep pitch, or a wet roof. Also stop if the guard is screwed under the first shingle course. Removing or forcing that type of guard can damage the roof edge or create a leak. If the gutter is sagging, the guard is loose, or water still overflows after the surface is clear, hire someone to clean gutters and assess the system safely.
When to Look Under the Guard
A guard can look clean from the ground while the trough below is holding grit, pollen, or wet leaf paste that slipped through the openings. Take a closer look if water sheets over the front lip during an otherwise normal rain. Plants or mud appear at the downspout outlet, or one section is sagging. Staining on the siding below a single corner is another warning sign. So is a panel that rattles when wind moves through it. These clues point to a water-flow or attachment problem that surface brushing alone may not solve.
Start with a simple flush rather than pulling panels apart. From a gutter end or an outlet, run a hose at a moderate flow and watch the discharge. Water should leave the downspout and move away from the foundation, not back up, spill over the edge, or pool at the outlet. If the water slows or backs up, the trough or downspout may still be restricted. A gutter inspection checklist can help you record these symptoms before deciding what needs attention.
Only lift a panel if it unclips easily and the design clearly allows it. Do not pry against a fastened guard. If screws run under the shingle, leave the panel in place. Forcing it can bend the guard, damage the roof edge, or create a gap that lets in more debris. A sagging section, a second-story location, or water that still overflows after the surface is clear is a good point to stop and have the system assessed.
Guards should have been installed over a clean, properly sloped trough. If the inside is packed with old sludge, that is a cleaning job before anyone talks about new guards. The guard may be doing its job at the surface while the material underneath continues to limit drainage. For more context on why buildup matters, read why gutter cleaning is important. Clearing the trough and confirming the downspout route first gives any later guard repair or adjustment a sound starting point.
Texas Debris and When to Call a Crew
Central Texas debris can challenge a guarded gutter even when the guard is doing its job. Live oak leaves, pecan litter, pollen, and seed pods can settle into a mat on the mesh after a dry spell. A hard rain may then turn that layer into paste, slowing water at the surface and around the openings. Roof valleys make the problem worse by directing concentrated runoff and debris toward inside corners.
After a storm, check those inside corners first. Look for water sheeting over the front edge, a visible layer of wet debris, or a corner that stays full while nearby sections drain. Brush loose material from the top of the guard, then rinse from the roof side toward the gutter with a gentle flow. The right motion depends on the guard style, so do not force a panel that is fastened beneath the first shingle course. A loose or bent section can create a gap and make the original problem worse.
Pine needles require a different kind of attention because they can collect along edges and in openings. For a broader look at the issue, see our guide to gutter guards for pine needles; this post does not pick a product. If you are deciding how maintenance fits into the rest of the year, our guide explains how often gutters should be cleaned without repeating that schedule here.
Some problems are signs to stop rather than keep testing a DIY method. Call TX Gutter Solutions when the home is two stories, the roof is steep or wet. The guard will not release, the gutter sags, or water still misses the downspout after a surface clean. A downspout that will not flush can point to a blockage below the guard, while a sagging run may need repair instead of more rinsing. Do not climb higher or pry at a secured guard simply to see what is underneath.
When the surface is clear, test the downspout from the outlet upward if you can do so safely. Water should leave the outlet and move away from the foundation rather than pooling beside the home. Watch the inside corners during that test: if water backs up there or spills over before the downspout carries it away. The issue may be below the guard or in the drainage path. That is a useful point to stop and have the full system checked.
TX Gutter Solutions serves homeowners in Austin, San Antonio, and Dallas-Fort Worth. For local help, explore our Austin gutter services. You can call 512-988-3110 for Austin, 210-716-7750 for San Antonio, or 682-259-4438 for Dallas-Fort Worth. The team provides a free, no-obligation estimate, and you can also request a free estimate online.
If the guard will not release or water still sheets over after a surface clean, request a free estimate before you climb again.
Frequently Asked Questions
Do gutter guards still need to be cleaned?
Yes. A guard keeps most leaves out of the trough, but live oak litter, pecan shells, pollen, and grit still land on top. If that layer stays wet, it turns into paste and can block the openings. Brushing the surface and checking the downspout outlet is the regular job, even on a guarded system.
Can I rinse gutter guards with a pressure washer?
Skip the pressure washer on mesh and screens. A hard jet can bend the mesh, drive grit through the openings, or lift the edge of a panel. A garden hose on a gentle spray, aimed from the roof side toward the gutter, is enough once the dry debris is brushed off.
Should I take the guards off to clean the inside?
Lift a panel only if it already unclips and you can see a reason, such as water sheeting over the lip or a downspout that will not flush. Leave any guard that is screwed under the first course of shingles. Prying that edge can tear the shingle and open a gap that lets water behind the gutter.
What if the guard looks clean but the gutter still overflows?
The clog is probably under the guard or in the downspout, not on the surface. Flush from an open end or the outlet and watch where the water comes out. If it never reaches the outlet, or the gutter sags, stop. That is a cleaning or repair visit, not another pass with a broom.
When should I stop and call someone?
Stop if the house is two stories, the roof is steep or wet, or you cannot keep three points of contact on the ladder. Also call if the guard will not release, a section is pulling away from the fascia, or water still misses the downspout after the surface is clear. TX Gutter Solutions can inspect the system and give a free, no-obligation estimate.
Get the Guards Flowing Again
If the surface is clean and water still is not leaving the downspout, look at the whole run instead of spending another afternoon on the ladder. TX Gutter Solutions cleans guarded gutters, resets loose leaf protection, and checks that runoff leaves the foundation. The visit is a free, no-obligation estimate for homes in Austin, San Antonio, and Dallas-Fort Worth.
Call 512-988-3110 or request a free estimate and tell us whether the water is sheeting over the guard or stalling in one corner.