
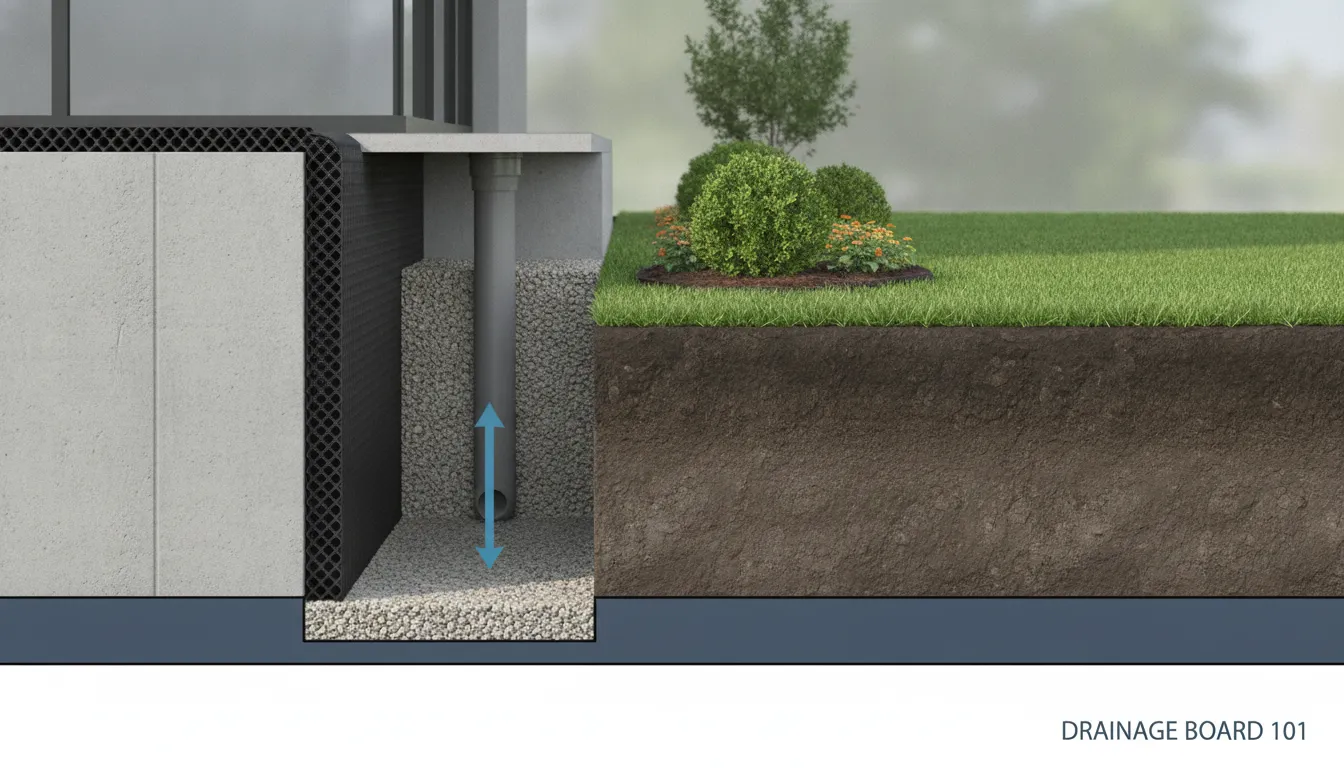
Foundation moisture problems often begin outside the home. Water collects in the soil, presses against the foundation, and searches for weak points around cracks, joints, and wall penetrations. A drainage board can help by giving that water a clear route away from the wall. Its dimpled core creates space for water to move downward, while some designs include filter fabric to limit soil buildup. But the board is only one part of the solution. A complete system may also include waterproofing, footing drains, sump equipment, gutters, downspouts, and proper grading. Here’s what homeowners should know before choosing or installing one.
Key Takeaways
- View drainage board as one layer of foundation protection: Pair it with waterproofing, footing drains, a working discharge point, proper grading, and well-maintained gutters and downspouts.
- Match the product to the property: Review drainage capacity, strength, filter fabric, membrane compatibility, soil conditions, groundwater exposure, and foundation design before choosing a board.
- Protect performance through careful installation and maintenance: Follow product instructions for orientation, seams, fasteners, terminations, and backfill, then keep outlets clear and inspect runoff systems regularly.
What Is a Drainage Board?
A drainage board is a below-grade building product that helps move water away from a foundation wall. Contractors typically install it on the outside of a waterproofing membrane, before backfilling the excavation. Most drainage boards are made from durable plastics, including polypropylene or high-density polyethylene (HDPE), and feature a dimpled or otherwise profiled core.
The board creates a drainage plane between the foundation and surrounding soil. When groundwater reaches the wall, channels in the board guide it downward toward a footing drain, drain tile, sump system, daylight outlet, or another approved discharge point. The board can also protect the waterproofing layer from rocks, soil, and backfill equipment.
A drainage board is one part of a complete water-management system, not a stand-alone foundation repair. The wall, waterproofing membrane, board, footing drain, grading, gutters, and downspouts all need to work together. For above-ground runoff, a properly designed gutter and downspout system helps keep roof water away from the foundation before it saturates the soil.
Create a Below-Grade Drainage Plane
Drainage boards create a dedicated path for water along the outside of a foundation wall. Rather than allowing wet soil to remain pressed directly against the wall, the board forms a space where water can travel downward. This makes drainage boards useful for below-grade walls, retaining walls, basements, and other structures exposed to damp soil.
Contractors commonly install them over a spray-applied or peel-and-stick waterproofing system. The board then adds a protective drainage layer while directing water toward the footing-drain system. WATERPROOF! Magazine’s overview of drainage boards and footing drains explains how these components work together below grade.
In Central Texas, changing soil moisture can affect foundation conditions. A drainage plane does not replace structural repairs, but proper installation can help manage water around the wall and reduce direct exposure to saturated soil.
Use Dimpled Cores and Air Gaps
Many drainage boards have a dimpled core that creates small channels, or air gaps, between the foundation wall and the soil. These channels give water a route downward and reduce the amount of surface area where wet soil presses directly against the waterproofing layer.
The dimples also provide space for groundwater, condensation, or moisture from small leaks to move toward the footing drain. Some products include a filter fabric on the soil-facing side. This fabric helps limit the amount of fine soil entering the channels, which can help preserve drainage capacity.
Installation direction matters. If the dimpled core faces the wrong way, the board may not provide the intended drainage path or membrane protection. Follow the manufacturer’s instructions for orientation, overlaps, corners, fasteners, and upper termination details. Never assume that two products with similar appearances install the same way.
Manage Groundwater and Hydrostatic Pressure
Hydrostatic pressure develops when water collects in soil and presses against a foundation wall. As soil becomes saturated, that pressure can contribute to seepage, dampness, cracks, or stress on below-grade construction. A drainage board helps reduce this pressure by giving groundwater a route away from the wall.
The system only works when the water has somewhere to go. The board’s channels must connect to a functioning footing drain, perforated pipe, sump basin, daylight outlet, or another planned discharge point. Polyguard’s explanation of dimple board drainage describes why a drainage board should be paired with waterproofing and a complete discharge system.
An open outlet is just as important as the board itself. If the footing drain is clogged, crushed, disconnected, or improperly sloped, water may remain trapped around the foundation. In that situation, installing a new board alone will not resolve the underlying drainage problem.
Compare Drainage Boards With Waterproofing Membranes
A waterproofing membrane helps block water from entering the foundation wall. A drainage board helps move water away from the wall and protects the membrane from damage. Because they perform different jobs, one product should not automatically replace the other.
Membranes may be spray-applied, sheet-based, or peel-and-stick. The appropriate option depends on the wall material, cracks, groundwater exposure, soil conditions, and product requirements. When the system calls for a drainage board, contractors install it over the membrane after the membrane has been properly applied and inspected.
A waterproof coating alone may not solve a recurring moisture problem. If water remains trapped against the wall, hydrostatic pressure can continue to affect the foundation. Effective below-grade waterproofing needs both a water-resistant barrier and a planned path for water to leave the area, as this drainage-system guidance explains.
Compare Drainage Boards With Protection Boards
A protection board is designed mainly to shield a waterproofing membrane from punctures, abrasion, and impact during backfilling. Some protection boards are flat, while others include profiles that create limited drainage channels.
Drainage boards combine membrane protection with drainage. Their profiled cores provide space for water to travel, while the board helps protect the membrane from soil and aggregate. Some products also include filter fabric to reduce soil intrusion. This creates a single below-grade layer that performs both functions.
Not every drainage board suits every foundation, however. Products vary in thickness, compressive strength, flow capacity, fabric design, and installation method. Compare the manufacturer’s technical information with the expected soil pressure and groundwater conditions. Drainage board product specifications can help clarify how a particular product handles below-grade demands.
Understand What Drainage Boards Cannot Fix
A drainage board cannot repair a cracked foundation, replace a failed waterproofing membrane, or clear a blocked footing drain. It also cannot correct grading that sends roof runoff toward the house. If water enters through structural cracks, wall penetrations, or damaged joints, those problems need to be identified and repaired as part of the larger solution.
The board cannot discharge water by itself, either. It needs a continuous path to a working drain or outlet. Soil can clog the channels, backfill can crush the core, and an improperly connected lower edge can prevent water from reaching the footing-drain system.
Start by reviewing the entire water route. Inspect gutters, downspouts, extensions, grading, catch basins, and drainage outlets along with the foundation. TX Gutter Solutions can help homeowners manage surface runoff through gutter, downspout, and drainage services. For wall excavation, structural damage, or persistent below-grade seepage, contact a qualified waterproofing or foundation specialist.
Which Drainage Board Fits Your Foundation?
The right drainage board depends on more than material or price. Your foundation type, soil, groundwater levels, waterproofing membrane, and installation method all affect performance. A board that works well against a poured-concrete basement wall may not suit a retaining wall, slab edge, or insulated foundation.
Begin by identifying where water is coming from and where it needs to go. Drainage boards help create a path for groundwater, but they work as part of a complete system that may include a waterproofing membrane, footing drain, gravel, cleanouts, and a reliable discharge point. Surface runoff matters, too. If rainwater is collecting beside the foundation, inspect and maintain your gutters and drainage systems before assuming the below-grade board is the only problem.
Consider the age and condition of the foundation as well. New construction allows installers to coordinate the wall, membrane, board, footing drain, and backfill from the start. A retrofit may require excavation beside an occupied home, repairs to the existing wall, and careful protection of landscaping, utilities, patios, and walkways.
Choose Dimpled HDPE or Polypropylene Boards
Dimpled drainage boards are commonly made from high-density polyethylene, or HDPE, and polypropylene. Their molded dimples create an air space between the foundation wall and surrounding soil, giving water a path toward the footing drain. Some products use a single layer, while others combine multiple layers for added drainage, filtration, or protection.
HDPE is widely used below grade because it is durable and resists moisture and many common soil conditions. Polypropylene can also provide dependable performance when its specifications match the project. Compare the product’s flow rate, compressive strength, thickness, puncture resistance, and installation requirements instead of choosing based on material alone. WATERPROOF! Magazine explains how dimple boards create drainage planes and why their design matters below grade.
Use Geocomposite Boards With Filter Fabric
A geocomposite drainage board combines a dimpled core with filter fabric, often called geotextile fabric. The core creates the drainage space, while the fabric faces the soil and helps keep fine particles from entering the channels. This design can reduce clogging in areas with silty or fine-grained soil.
Look for fabric that is securely bonded to the core and rated for the soil conditions at your property. It should allow water to pass while retaining soil, and it must remain intact during backfilling. A product such as Delta-Drain uses a molded HDPE core and heat-bonded geotextile face, showing how the two components work together. Filter fabric does not replace proper grading, cleanouts, or an open footing-drain outlet.
Consider Insulated Drainage Boards
Insulated drainage boards can serve two purposes: directing groundwater away from the foundation and helping protect the wall from temperature changes. They may be useful around conditioned basements, below-grade living areas, or foundations that need additional thermal protection. The insulation layer can also shield rigid foam from backfill, loose stones, and other damage during installation.
Check the product’s drainage capacity and compressive strength, not just its insulation rating. The board needs to withstand soil pressure without collapsing its drainage channels. It must also work with the selected waterproofing membrane, fasteners, and wall assembly. Insulated products are not appropriate for every foundation, especially when the main concern is heavy groundwater or high backfill pressure. A waterproofing professional can determine whether insulation adds practical value to the complete system.
Match Boards to Walls, Retaining Walls, and Slabs
Drainage boards are used in several applications, but installation requirements vary. Foundation walls may need a board that connects directly to a footing drain. Retaining walls may require stronger materials because of lateral soil pressure. Slabs, decks, plazas, planters, and similar structures may use drainage boards to move water beneath or beside the assembly.
Choose a product rated for the specific surface and expected load. Pay close attention to corners, transitions, penetrations, and the route to the discharge point. A board designed for a vertical foundation wall may not be suitable beneath a slab or behind a heavily loaded retaining wall. Product literature for below-grade drainage boards lists applications beyond foundation walls, which can help you compare intended uses before purchasing.
Choose Between New Construction and Retrofit Installation
New construction gives installers more control. The wall is accessible, the footing drain can be installed correctly, and the board can be secured before backfill. Builders can also work around weather more easily with some dimpled products, since they do not require the same dry, above-freezing conditions as certain fluid-applied membranes. Polyguard notes that dimple boards can extend the working season.
Retrofit work is more involved. A crew may need to excavate beside an existing wall, locate utilities, remove damaged material, repair cracks, install or replace waterproofing, and protect nearby landscaping. The existing footing drain may be buried, clogged, missing, or difficult to access. Before selecting a board, confirm that excavation can reach the full problem area and that water will have a reliable path out.
For Central Texas homes, excavation may also expose dense clay, buried construction debris, tree roots, or unstable soil. These conditions can affect both the installation plan and the amount of backfill support the board needs. A professional assessment can prevent you from buying a product that cannot be installed safely at the problem area.
Match Boards to Soil, Groundwater, and Structural Loads
Soil type affects how quickly water reaches the foundation and how much pressure the board must withstand. Clay soil drains slowly and can expand when wet. Sandy or gravelly soil may allow faster water movement, but it can also carry particles into an unprotected drainage plane. High groundwater, steep slopes, and poor surface drainage may require greater drainage capacity and a more robust discharge system.
Consider the weight of backfill and any nearby driveways, patios, retaining walls, or equipment. Check compressive strength under the expected load, along with puncture resistance and long-term drainage performance. Some heavy-duty products are rated for loads up to 11,000 pounds per square foot, but manufacturer test data and installation conditions still need to match your site.
When soil, groundwater, or structural conditions are uncertain, have a qualified specialist assess the foundation before excavation begins. The right board should fit the entire drainage plan, not just the wall surface.
Which Drainage Board Features Matter Most?
A drainage board is only one part of a foundation water-management system. The right product should move water toward the footing drain, withstand pressure from backfill, protect the waterproofing layer, and remain stable after installation. A low-cost board may seem appealing, but it can cause problems if its channels collapse, its fabric clogs, or its fasteners damage the membrane.
When comparing products, look beyond the board’s advertised thickness. Review its tested flow rate, compressive strength, puncture resistance, filter fabric, installation requirements, and warranty. These details matter in Central Texas, where expansive clay soil, intense rain, uneven grading, and foundation movement can place added demands on below-grade drainage systems.
The board also needs a clear path to a working footing drain, sump system, daylight outlet, or another approved discharge point. No drainage board can compensate for a blocked pipe or poor surface-water management. Use the following features to compare products and discuss the right system with a qualified waterproofing or drainage professional.
Check Drainage Capacity Under Soil Pressure
Drainage capacity describes how much water can move through a board’s drainage plane. A product may show a strong flow rate in laboratory conditions, but performance can change after soil presses against the board and compresses its channels. Look for flow-rate data tested under loads that resemble actual backfill conditions.
For example, one Polyflow 10 specification lists drainage capacity of up to 18 gallons per minute per foot. Use that figure as a comparison point, not a guarantee for every installation. Ask how the manufacturer tested the board, what pressure it used, and whether the result applies with filter fabric attached. You can review the published Polyflow drainage specifications before comparing products.
Also consider the amount of groundwater your property may receive. A sloped lot, high water table, saturated clay, or foundation wall near a hillside may require greater drainage capacity than a dry, level site.
Compare Compressive Strength and Puncture Resistance
Backfill places continuous pressure on a drainage board. Rocks, construction debris, roots, and uneven soil can also press against the board and the waterproofing membrane. Compressive strength shows how well the core resists crushing, while puncture resistance indicates how well the product withstands sharp or concentrated impacts.
Review both measurements instead of relying on a general durability claim. A listed core compressive strength of 11,000 pounds per square foot and a fabric CBR puncture strength of 250 pounds, for example, provide useful reference points. These values appear in the published Polyflow product information.
The required strength depends on the site. Deep excavations, rocky soil, retaining walls, vehicle loads, and irregular backfill may call for a more robust product. An installer should inspect the wall and excavation area for conditions that could damage the board during placement or backfilling.
Evaluate Core Thickness, Dimple Profile, and Air Gaps
A drainage board’s core creates the open space where water travels downward. Many products use a molded high-density polyethylene, or HDPE, dimpled core. The dimples hold the board away from the wall and create an air gap between the waterproofing layer and surrounding soil.
Core thickness matters, but a thicker board is not automatically the right choice. Dimple height, shape, spacing, and resistance to compression all affect performance. If the dimples flatten under backfill, the drainage path may become restricted. Ask for test data showing how the core performs under expected soil pressure.
The board should sit flat and continuously against the foundation wall. Folds, damaged sections, poorly fitted corners, and large gaps can interrupt water flow. Product information for dimpled drainage boards can help you compare core construction, air-gap design, and installation details.
Check Filter Fabric, Soil Retention, and Clog Resistance
Some drainage boards include geotextile filter fabric on the side facing the soil. This layer allows water to enter the drainage channels while holding back soil particles. It can help protect the air gap from clogging, particularly when the surrounding soil contains silt, sand, or other fine material.
Look for details about how the fabric is attached and what type of soil it is designed to filter. A heat-bonded Typar geotextile face, for example, is described as helping keep soil out and reduce clogging in Delta Drain products. Review the manufacturer’s filter fabric and drainage-board specifications rather than assuming every fabric-covered board performs the same way.
The fabric does not replace careful installation. Workers still need to remove loose debris, protect the board during backfill, and use suitable soil or aggregate. Torn, folded, or mud-covered fabric may not perform as intended.
Confirm Waterproofing Membrane Compatibility
A drainage board protects and manages water around a waterproofed foundation wall. It is not a substitute for repairing cracks or applying a compatible waterproofing membrane. Before choosing a board, confirm that its backing, attachment method, and drainage profile work with the membrane specified for the wall.
Some membranes require adhesive, approved fasteners, protection layers, or specific installation temperatures. Other systems restrict where fasteners can be placed. An incompatible board can damage the membrane, create voids, or interfere with its bond to the concrete.
Ask the waterproofing manufacturer to identify approved drainage-board combinations. Polyguard, for example, recommends pairing its dimple board products with its below-grade waterproofing membrane systems in its guidance on dimple board and foundation drainage. Follow written specifications for overlaps, terminations, penetrations, and repairs rather than using a general-purpose installation method.
Review Fasteners, Termination Bars, Seams, and Accessories
A high-quality board can still perform poorly when installers overlook edges and transitions. Review the complete accessory package, including fasteners, termination bars, mold strips, sealants, corner pieces, pipe connections, and repair patches. These components help keep the board secure and prevent soil from entering the drainage plane.
The top edge needs special attention. It should be secured above the expected finished grade and protected from water, soil, insects, and landscape activity. Seams and corners should overlap or connect according to the manufacturer’s instructions. Poorly fitted joints can let soil into the channels or create weak spots during backfilling.
Ask how the system handles wall penetrations, footing transitions, inside corners, outside corners, and elevation changes. Installation guidance for drainage-board edges and terminations recommends finishing edges with suitable mold strips and sealant. Confirm the exact accessories required for the product you select.
Verify Manufacturer Testing, Data Sheets, and Warranties
Manufacturer documents should provide more than broad statements about strength or performance. Look for technical data sheets that list drainage capacity, compressive strength, puncture resistance, core dimensions, fabric details, chemical resistance, installation instructions, and approved uses.
Independent testing, building-code approvals, and recognized certifications can make product comparisons easier. Some drainage-board products, for example, list approval under National Building Code CCMC 13209-R.534 for below-grade drainage. One approval does not automatically make a product suitable for every property, but it gives you a useful point of reference.
Read the warranty carefully. Determine whether it covers the board alone or the complete drainage system, including installation and related waterproofing. Check exclusions for improper fasteners, damaged fabric, unapproved membranes, missing footing drains, and unsuitable soil conditions. Keep the manufacturer’s product documentation with your project records so future repairs follow the original system requirements.
Compare Brands by Specifications and Value
Brand recognition can help, but it should not replace a side-by-side review of specifications. Compare each product’s flow rate under pressure, compressive strength, puncture resistance, core design, filter fabric, warranty, and installation requirements. Include the cost of fasteners, sealants, termination materials, and other accessories required for a complete installation.
A less expensive roll may cost more over time if it requires extra protection, special fasteners, or frequent repairs. Labor and site conditions matter, too. A board that is easier to cut, overlap, and secure may reduce installation time and the risk of installation errors.
Value depends on whether the product suits the foundation. A basic board may work for a straightforward wall with stable soil and a reliable footing drain. A deep excavation, retaining wall, or property with persistent groundwater may require a stronger composite system. Use the manufacturer’s technical product information as a starting point, then have a qualified professional match the board to the wall, soil, waterproofing membrane, and discharge plan.
How Does a Drainage Board Work With Waterproofing and a Footing Drain?
A drainage board works as part of a complete foundation water-management system. It does not replace waterproofing, a footing drain, or proper surface drainage. Instead, each component handles a different part of the job: the waterproofing membrane helps seal the foundation wall, the drainage board creates a protected path for water, and the footing drain carries collected water away from the base of the structure.
This layered approach matters because below-grade water can come from groundwater, saturated soil, condensation, or runoff that reaches the foundation. When water has nowhere to go, it can create hydrostatic pressure against the wall and increase the risk of seepage, cracking, or interior moisture problems. A properly designed system guides water away from the wall instead of allowing it to collect beside the foundation.
The Waterproof! Magazine guide to drainage boards and footing drains explains how these components work together. The exact materials, installation sequence, and discharge method should match the foundation design, soil conditions, local requirements, and product instructions.
Sequence the Foundation Wall, Membrane, and Board
A typical below-grade system starts with the foundation wall. Before installing drainage material, the wall should be clean, sound, and free of damage that could affect waterproofing. Cracks, holes, rough areas, and wall penetrations may need repair before the membrane is applied.
The waterproofing membrane goes directly on the prepared foundation wall. Depending on the project, it may be a spray-applied coating, peel-and-stick sheet, or another approved product. The drainage board is installed over the cured or prepared membrane, creating a protective layer between the wall and the surrounding soil.
This sequence gives the wall two forms of protection. The membrane helps resist water entry, while the board shields the membrane from punctures caused by backfill, rocks, and construction activity. Product instructions determine the required curing time, attachment method, overlaps, and termination details. Installing the board too early or fastening it incorrectly can damage the waterproofing layer.
Direct Water Through the Drainage Plane
Most drainage boards use a dimpled or molded core to create open channels beside the foundation. These channels form a drainage plane, giving water a route downward instead of allowing it to press directly against the wall. Some products also include filter fabric that keeps soil particles from filling the channels.
As water reaches the board, gravity pulls it toward the footing drain at the base of the wall. The board does not usually pump water or move it uphill. Its job is to maintain a predictable air and drainage space while protecting the waterproofing membrane.
The system works only when the drainage plane remains open. Excessive soil pressure, crushed channels, clogged fabric, poor overlaps, or a blocked footing drain can limit flow. Installers should choose a board with enough compressive strength for the expected backfill and follow the manufacturer’s installation details. The manufacturer’s drainage board information can help confirm the product’s intended orientation and drainage design.
Position the Board Against the Wall or Soil
Drainage board orientation depends on the product. Some dimpled boards are installed with the dimples facing the foundation wall, while other systems use a different configuration or attach filter fabric to one side. Always follow the manufacturer’s instructions instead of assuming every board installs the same way.
The top of the board generally terminates at or slightly above finished grade, where it can be secured and protected from surface water. The bottom should reach the footing-drain zone so water can transfer into the drainage layer without a gap.
The board should sit flat against the wall, with corners, seams, penetrations, and transitions handled according to the product details. Do not leave loose sections that can fold, collapse, or collect soil. Backfill should support the board without crushing its channels. A careful layout also helps prevent exposed edges that could allow surface runoff to enter behind the system.
Connect the Board to a Perforated Footing Drain
The footing drain receives water that travels down the drainage board and carries it away from the foundation. It usually consists of perforated pipe placed beside or near the footing and surrounded by clean drainage aggregate. The perforations allow water from the surrounding soil and drainage plane to enter the pipe.
The pipe needs a suitable outlet and enough slope, unless the design uses a sump pump or another approved method to move water. Its location also matters. If the pipe is too high, water may remain at the footing. If it is placed incorrectly or surrounded by poorly draining material, it may collect less water than intended.
A footing drain should not be treated as an isolated pipe installation. It works with the drainage board, waterproofing, gravel, filter fabric, cleanouts, and discharge point. Local building requirements may also specify pipe size, aggregate, inspection access, and connection details. A waterproofing or excavation professional can evaluate these components together, especially when adding a system to an existing foundation.
Set Pipe Slope and Add Gravel, Filter Fabric, and Cleanouts
A footing drain needs a route that carries water toward its outlet. Where gravity discharge is possible, the pipe should follow the designed slope without low spots that allow sediment and water to collect. Flexible polyethylene tubing can reduce the number of fittings, although the right pipe type depends on the project and local requirements.
Clean drainage gravel surrounds the pipe and creates space for water to move toward the perforations. Filter fabric may separate soil from the gravel, reducing the amount of sediment that reaches the pipe. Fabric placement must follow the system design, since wrapping materials incorrectly can restrict flow or create a clogging point.
Cleanouts provide access for inspection and maintenance. They are particularly useful where the drain changes direction, connects to another line, or travels a long distance. A contractor should verify the pipe’s slope, connections, aggregate, fabric, and cleanouts before backfilling. Covering these components too early makes problems harder and more expensive to correct.
Route Water to a Sump, Daylight Outlet, or Approved Discharge
Water collected by a footing drain needs a reliable destination. Depending on the property, the system may discharge by gravity to daylight, connect to an approved stormwater system, or flow to a sump basin where a pump removes it. The right option depends on elevation, lot slope, groundwater conditions, municipal rules, and the location of nearby structures.
A daylight outlet works when the drain can maintain a continuous downward path to a safe point on the property. The outlet should remain visible, protected from damage, and positioned so water does not flow back toward the foundation. A sump system may be necessary when the footing drain sits below the available discharge point.
Do not direct foundation drainage onto a neighbor’s property, against a walkway, or beside another foundation. Local rules may restrict connections to storm drains or require specific discharge controls. Before installation, review the site and confirm the outlet plan with a qualified contractor or local authority. A complete drainage assessment can also identify how foundation drainage should work with above-ground runoff controls.
Relieve Hydrostatic Pressure Through an Open Outlet
Soil can hold a significant amount of water after prolonged or heavy rain. As that water collects around a foundation, it creates hydrostatic pressure against the wall. The pressure may contribute to seepage through cracks, joints, penetrations, or porous concrete, particularly when waterproofing is damaged or missing.
A drainage board helps by giving water a vertical path down the wall. The footing drain then receives that water and moves it toward a functioning outlet. This reduces the amount of water resting beside the foundation and helps limit pressure on the wall and waterproofing membrane.
The outlet must stay open and functional for the pressure-relief pathway to work. Soil, mulch, roots, ice, debris, crushed pipe, or a failed sump pump can block the system. If water continues to collect after installation, the problem may involve the outlet, pipe slope, groundwater level, waterproofing, or foundation condition. Inspecting the full drainage route is more useful than replacing the board alone.
Manage Runoff With Gutters, Grading, and Downspouts
A below-grade drainage system should work with the systems that manage water above ground. Gutters collect roof runoff, while downspouts carry it away from the foundation. If downspouts release water next to the wall, the footing drain and drainage board may receive more water than they were designed to handle.
Proper grading also helps. Soil should direct surface water away from the foundation rather than creating low spots beside the wall. Extensions, splash blocks, catch basins, channel drains, and landscape drainage may help manage runoff where standard downspouts are not enough.
Regular maintenance matters in Central Texas, where heavy rain, expansive clay soil, uneven settlement, and shifting drainage patterns can affect foundation water management. Clear leaves and sediment from gutters, inspect downspout connections, and check discharge points after major storms. TX Gutter Solutions provides gutter, downspout, and drainage services for homeowners who need to connect roof runoff management with broader foundation protection.
How Do You Install a Drainage Board Correctly?
A drainage board is one part of a complete foundation water-management system. It does not replace a waterproofing membrane, footing drain, proper grading, functioning downspouts, or a reliable discharge point. Instead, it creates a drainage plane that helps move water down the foundation wall and toward the footing drain, while the membrane helps keep moisture out of the wall.
Correct installation starts before the board reaches the job site. The crew must plan excavation, locate underground utilities, inspect the foundation, repair cracks, apply the membrane, and confirm that water has somewhere to go. A small mistake at a seam, corner, penetration, or drain connection can allow water behind the system.
Product details vary between manufacturers. Some boards use a dimpled plastic core, while others combine drainage channels with filter fabric or insulation. Always follow the product instructions for orientation, fasteners, overlaps, terminations, and backfill. The WATERPROOF! Magazine guide to drainage boards and footing drains explains how these components work together below grade.
Plan Excavation, Access, Utilities, and Safety
Before excavation begins, identify the foundation wall, equipment access points, soil conditions, and a safe location for excavated soil. The crew should also plan how workers will enter and leave the excavation. This helps prevent unnecessary disruption to landscaping, walkways, driveways, and nearby structures.
Contact the appropriate utility-locating service before digging. Electrical, gas, water, sewer, irrigation, and communication lines may cross the work area. Damaging one can create serious hazards, expensive repairs, and delays.
Excavation near a foundation requires particular care. Do not remove more soil than necessary, undermine the footing, or leave an open trench unprotected. Wet Central Texas clay can become unstable after rain. Depending on the depth and site conditions, the project may require shoring, staged excavation, or specialized equipment. Waterproofing Magazine’s excavation guidance provides additional safety considerations.
Clean the Wall and Repair Cracks or Damage
The foundation wall must be clean before the waterproofing membrane is applied. Remove loose soil, dust, concrete residue, old coatings, and other debris that could interfere with adhesion. A clean, sound surface gives the membrane a better chance of forming a continuous seal.
Inspect the wall for cracks, open joints, honeycombing, deteriorated concrete, and movement around pipes or other penetrations. Repair these areas with compatible materials before continuing. Active leaks may need injection, joint repair, or another treatment instead of being covered with a membrane.
Pay close attention to the wall-to-footing joint and construction joints. These areas can collect water and may need reinforcing material or a compatible sealant. Polyguard’s guidance on dimple board installation also emphasizes repairing wall damage before installing the drainage assembly. Do not cover defects that have not been evaluated.
Apply, Cure, and Inspect the Waterproofing Membrane
Apply the waterproofing membrane to the prepared wall according to the product instructions. Required thickness, primer, temperature range, application method, and drying time can differ between liquid-applied and sheet membranes.
Do not install the drainage board while the membrane is wet, soft, or uncured. Moving soil or handling fasteners too soon can tear the membrane, create thin spots, or pull it away from the wall. Allow the membrane to cure for the period specified by the manufacturer, taking temperature and humidity into account.
Inspect the coating before covering it. Look for pinholes, blisters, gaps, fishmouths, exposed concrete, and uneven coverage. Repair defects before placing the board, because access becomes limited once the wall is covered. Product instructions from Delta Drain can help clarify installation requirements for compatible drainage systems.
Position and Secure the Board as Directed
Position the drainage board so its channels remain continuous from the upper wall toward the footing drain. Many systems place the filter fabric toward the soil, but orientation varies. Check the manufacturer’s instructions rather than relying on the board’s appearance.
Keep the board flat against the wall, without large folds, loose sections, or crushed dimples. At the base, connect the board to the drainage system so water can move toward perforated pipe, drain tile, or a sump system.
Use only the fasteners and attachment methods approved for the product. Unapproved fasteners may puncture the membrane or fail under soil pressure. Make sure each panel remains stable as the installation progresses, then cover the assembly promptly with suitable backfill to limit exposure to weather, tools, and site traffic.
Fasten the Top Edge Above Grade
The top edge should terminate at the required grade line and remain secure during backfilling. Depending on the system, installers may use grip fasteners, screws, termination bars, or specialized T-fasteners. The attachment method should hold the board in place without creating unnecessary openings in the waterproofing layer.
Keep the termination continuous along the wall. A loose upper edge can allow soil behind the board, interrupt the drainage plane, and expose the membrane to damage. The termination should also coordinate with siding, flashing, brick, stucco, or another exterior finish.
Avoid placing the top edge below the final soil level unless the product specifically requires it. Confirm the finished grade before fastening. Delta Drain product information offers examples of fastening and termination requirements for drainage boards.
Cut, Overlap, and Seal Seams, Corners, and Transitions
Measure each wall section before cutting the board. Accurate cuts reduce waste and help drainage channels align at corners and transitions. Large rolls may reduce the number of seams, but they require enough room and labor for safe handling.
Overlap adjacent sections as directed by the manufacturer. Preserve the drainage path instead of allowing one panel to block another. Seal seams with the compatible tape, sealant, strip, or accessory specified for the system. Avoid unapproved adhesives that could soften the membrane or break down underground.
Corners need careful attention. Fold or cut the board so it remains continuous around inside and outside corners without large gaps. Seal transitions near grade, footing drains, steps, retaining walls, and changes in wall height. Proper seam details help limit water intrusion and keep soil from entering the drainage plane.
Protect Wall Penetrations and Footing-Drain Connections
Pipes, sleeves, utility entries, cleanouts, and other penetrations interrupt the drainage plane. Detail each opening with compatible flashing, sealant, membrane materials, or manufacturer-approved accessories. Do not simply cut a large hole around a pipe and leave the gap unsealed.
At the base of the wall, connect the board to the footing-drain assembly. The fabric, core, and membrane should direct water toward the pipe without creating a pocket where sediment can collect. Confirm that the pipe outlet, cleanout, sump connection, or daylight discharge is open and accessible.
Finish exposed edges and transitions with the specified mold strip, termination accessory, or sealant. The Delta Drain installation information provides examples of accessories used around terminations and footing-drain connections. Follow the product instructions for every penetration.
Backfill Without Crushing Channels or Damaging the Membrane
Backfill only after the board, membrane, seams, terminations, and drain connections have been inspected. Use material suitable for the system and free of large rocks, construction debris, or sharp objects that could puncture the assembly.
Place soil carefully instead of dumping heavy loads directly against the wall. Keep equipment buckets, compactors, and wheelbarrows from striking the board. Excessive force can crush dimples, close drainage channels, tear filter fabric, or damage the waterproofing membrane.
Follow project requirements for lift thickness and compaction. Backfill may settle if placed too quickly, while aggressive compaction can place unnecessary pressure on the wall. The WATERPROOF! Magazine installation guidance recommends protecting both the drainage channels and membrane during backfilling.
Avoid Common Installation Mistakes
Several problems occur repeatedly during below-grade drainage projects:
- Installing the board before the membrane has cured
- Facing the filter fabric or drainage core in the wrong direction
- Leaving seams, corners, or penetrations unsealed
- Covering the footing drain without checking its outlet
- Crushing channels with unsuitable backfill or equipment
- Stopping the board short of the required grade or footing connection
- Relying on the board to correct poor grading or blocked downspouts
- Covering damage before completing a final inspection
A drainage board cannot compensate for a failed waterproofing membrane, an undersized footing drain, or a blocked discharge point. Before backfilling, inspect every transition and photograph concealed work for future maintenance records. Confirm that gutters, downspouts, and surface drainage direct water away from the foundation. These above-grade systems are part of the same water-management plan.
Hire a Waterproofing Specialist When Needed
Professional help is especially important when the project involves an existing foundation leak, deep excavation, structural cracks, high groundwater, expansive Central Texas clay, or limited access around the home. These conditions can affect excavation safety, membrane selection, drain placement, and the best discharge method.
A specialist can assess whether the problem comes from wall seepage, hydrostatic pressure, a failed footing drain, poor grading, or surface runoff. This prevents homeowners from spending money on a drainage board when the primary repair belongs elsewhere. Polyguard recommends consulting a waterproofing specialist when below-grade leaks could lead to expensive repairs.
Above-grade runoff also deserves attention. A contractor such as TX Gutter Solutions can evaluate gutters, downspouts, and drainage systems that may be directing water toward the foundation. Below-grade waterproofing and excavation may require a separate specialist, but every part of the system should work together.
What Does Drainage Board Cost?
Drainage board prices vary based on the product type, thickness, roll size, drainage capacity, and the area you need to cover. A lightweight dimpled sheet may cost less than a reinforced board designed to withstand high soil pressure. Filter fabric, insulation, core depth, and puncture resistance can also affect the price.
The board itself is only one part of a below-grade drainage system. Your total project cost may include excavation, foundation repairs, waterproofing membrane, footing drains, perforated pipe, gravel, filter fabric, cleanouts, backfill, and surface restoration. Drainage boards guide water down the foundation wall, while footing drains collect and carry that water away from the structure. Waterproofing Magazine explains how these components work together.
For a more accurate estimate, separate the cost into three categories: materials, installation, and site restoration. This approach makes it easier to compare quotes and identify whether a contractor is offering a complete drainage solution or pricing only the board.
Compare Prices by Type, Thickness, and Roll Size
Drainage boards come in several designs, and each one is intended for different site conditions. Basic dimpled sheets may work for some foundation applications, while thicker or reinforced products may be better suited to dense soil, rocky backfill, or walls exposed to greater pressure. Boards with filter fabric or insulation usually cost more than standard sheets.
Roll dimensions also affect the price. A larger roll may reduce the material cost per square foot, but it can be more difficult to transport and handle around a home. You will also need to account for overlaps, corners, cuts, penetrations, and installation waste.
For one retail comparison, Overlake Supply lists several Delta Drain products in 4-by-50-foot rolls, with prices ranging from about $301.22 to $326.33. You can compare Delta Drain drainage board options by type and listed price before requesting a project estimate.
Estimate 4-by-50-Foot Roll Prices
A 4-by-50-foot roll covers approximately 200 square feet before accounting for overlaps and cuts. Based on listed retail prices, Delta Drain products in this size may cost roughly $300 to $330. Polyguard Polyflow 10 drainage board, also sold in a 4-by-50-foot roll, is listed at $529.79 by one retailer. These examples show why product specifications matter when comparing prices.
Retail pricing generally covers the board only. You may also need compatible fasteners, termination bars, seam materials, filter fabric, corner accessories, and delivery. Freight charges can be significant because drainage board rolls are bulky.
Measure the foundation wall before ordering, then add material for corners, overlaps, steps, and penetrations. A contractor can help calculate the required quantity and determine whether the selected board suits the wall, soil, and waterproofing system.
Calculate Complete Installed-System Costs
The complete cost depends on the condition of the foundation and the amount of work required to install a functioning drainage system. If the wall already has a sound waterproofing membrane and an accessible footing drain, the project may involve less excavation and fewer repairs. If the wall is cracked or the existing drain is blocked, the scope can increase quickly.
A full system may include wall preparation, crack repairs, waterproofing membrane, drainage board, perforated footing pipe, washed gravel, filter fabric, cleanouts, and a discharge route. The board directs water downward, but it does not remove water by itself. The collected water still needs a clear path to a sump, daylight outlet, or another approved discharge point.
Ask contractors to list each component separately in the estimate. This helps you compare complete systems instead of choosing a quote based only on the price of the board. For related surface-water solutions, review TX Gutter Solutions’ drainage services.
Include Excavation, Labor, Membranes, Pipe, Aggregate, and Backfill
Excavation can represent a major part of the budget, especially when crews must dig several feet below grade along a foundation wall. Costs may increase when access is limited, the soil is compacted clay, utilities are nearby, or landscaping, patios, walkways, or irrigation lines must be removed.
A complete estimate should identify labor, foundation repairs, waterproofing membrane, drainage board, perforated pipe, aggregate, filter fabric, cleanouts, backfill, and surface restoration. It may also include hauling away excess soil and replacing damaged landscaping or hardscaping.
The lowest material price may not produce the lowest overall cost. Installing a drainage board against a wall with unresolved cracks may leave water entry problems in place. A board connected to a blocked or poorly routed footing drain may also fail to relieve water pressure. The installation plan matters as much as the product selection.
Buy From Manufacturers, Suppliers, Distributors, or Online Retailers
Drainage board is available from manufacturers, building-material suppliers, waterproofing distributors, and online retailers. Manufacturers and specialty distributors can be useful when you need technical data, compatible accessories, or guidance on selecting a product for a specific foundation condition.
Online retailers make it easier to compare standard roll sizes and listed prices. However, shipping large rolls may add to the cost, and product listings may not include all the accessories required for installation. Local suppliers may offer faster pickup and more practical support when materials need to coordinate with excavation or waterproofing work.
Before buying, confirm that the product is intended for your application. Some boards are designed for foundation walls, while others are intended for retaining walls, slabs, or landscaping systems. Verify membrane compatibility, installation requirements, fastener recommendations, and the product’s performance data before placing an order.
Check Inventory, Delivery, Support, and Returns
Check inventory before scheduling excavation. An online listing may show a product without confirming that the material is ready for immediate shipment. Ask whether the roll is in stock, where it will ship from, and whether the supplier expects a delay.
Delivery planning also matters. Large rolls need a suitable drop-off location, and some deliveries may require special unloading arrangements. Confirm freight charges, delivery timing, and how the supplier handles material that arrives damaged. Store the board where it will remain protected from unnecessary damage before installation.
Review the return policy before purchasing. Some suppliers may not accept opened, cut, or special-order materials. Ask how the company handles missing accessories, incorrect shipments, technical questions, and warranty claims. You can review listed drainage board products and purchasing information before comparing local and online suppliers.
Compare Quotes by Complete System Components
Ask each contractor to describe the entire proposed drainage system, not just the board. The written estimate should identify excavation, wall preparation, foundation repairs, waterproofing membrane, drainage board, footing drain, aggregate, filter fabric, cleanouts, discharge routing, backfill, and surface restoration.
Check whether the quote includes utility locating, soil removal, permits, landscaping repairs, hardscape replacement, taxes, and cleanup. Also ask how the contractor handles unexpected conditions, such as damaged foundation walls, buried debris, or a failed existing footing drain.
Compare proposals with the same scope of work whenever possible. A quote featuring a more expensive board may not provide better value if it does not include a discharge connection or proper footing-drain work. A complete proposal should explain how water will move from the foundation wall to its final outlet.
Check Availability in Austin, San Antonio, and DFW
Drainage board availability and pricing can vary across Austin, San Antonio, Dallas-Fort Worth, and surrounding communities. Local stock may depend on the product type, roll size, current construction demand, and whether the board is a standard or special-order material. Contact suppliers directly to confirm current availability and delivery options.
Central Texas properties can also require different installation plans. Expansive clay soil, sloped lots, shallow discharge routes, mature landscaping, and heavy rainfall can affect excavation and drainage design. A contractor should evaluate the property before recommending a board based only on a catalog description.
Surface runoff can contribute to foundation moisture when gutters overflow or downspouts discharge too close to the home. TX Gutter Solutions serves Austin, San Antonio, Dallas-Fort Worth, and nearby communities with gutter, downspout, drainage, and maintenance services. A site-specific assessment can help determine whether improving exterior water management should be part of the broader foundation protection plan.
How Should You Compare Drainage Board Reviews and Warranties?
Drainage board reviews can show how a product performs during real installation projects, but they should not be your only source of information. A review may mention a torn sheet, clogged fabric, or difficult installation without explaining whether the issue came from the board, waterproofing membrane, footing drain, or backfill process. Look for repeated patterns, then compare those observations with the manufacturer’s technical data.
A complete drainage system depends on more than the board. The board must collect water, protect the foundation wall, and direct moisture toward a working footing drain or another approved outlet. As WATERPROOF! Magazine explains, drainage boards guide water down the wall, while footing drains carry it away from the structure. That relationship should guide your review of product performance, installation quality, and warranty coverage.
Use Reviews to Evaluate Handling and Installation
Look for reviews that explain how the board performed during cutting, fastening, overlapping, and backfilling. Installation details matter because a product can perform well in testing but fail when workers crush the dimples, tear the filter fabric, or leave gaps between sections.
Pay attention to comments about roll weight, flexibility, instructions, and compatibility with the waterproofing membrane. Reviewers may also explain whether the board stayed in place on uneven walls or required specialized fasteners. These details can show whether a product is practical for your foundation and site conditions.
Poor handling does not always indicate a defective product. Improper design or installation can cause serious problems in below-grade drainage systems, as Polyguard’s discussion of dimple boards explains. Give more weight to reviews that include photos, project details, soil conditions, and a clear description of the installation process.
Compare Durability, Drainage, and Long-Term Value
A drainage board creates a protective layer between the foundation and surrounding soil. Its dimples or drainage channels give water a path downward, helping reduce moisture and soil pressure against the wall. When comparing reviews, look for evidence that the board retained its shape after backfilling and continued directing water toward the footing drain.
Long-term value also depends on how well the board protects the waterproofing membrane. A higher-priced product may make sense if it offers stronger puncture resistance, better soil retention, or simpler installation. A less expensive option may lead to added costs if it tears during backfill or requires repairs.
Do not judge value by the purchase price alone. Compare drainage capacity, compressive strength, accessories, delivery costs, expected service life, and installation requirements. Product data, such as the drainage board specifications from Overlake Supply, can help you compare models more consistently.
Watch for Complaints About Damage, Clogging, and Support
Repeated complaints deserve attention, especially when they involve damaged dimples, torn fabric, blocked drainage channels, or poor customer support. One negative review may reflect a handling mistake. Several similar reports may point to a product limitation, unclear instructions, or inadequate packaging.
Pay close attention to comments about filter fabric. Fabric-covered boards allow water to pass through while holding back soil and debris. This can reduce hydrostatic pressure, but the fabric may clog if the surrounding soil, aggregate, or installation method is unsuitable. Useful reviews should explain where and how the clogging occurred.
Also consider the manufacturer’s response. Does the company provide installation guidance, answer technical questions, and help customers identify compatible membranes and drains? Responsive support can matter when a project involves difficult soil, a high water table, limited access, or an unusual foundation layout.
Separate Product Issues From Installation or Outlet Problems
Water intrusion does not automatically mean the drainage board failed. The problem may come from an unsealed seam, damaged waterproofing membrane, blocked footing drain, poor grading, or an outlet that cannot discharge water. Reviews are more useful when they distinguish between these components.
For example, a board may collect water correctly but have nowhere to send it. If the footing drain is clogged or the sump pump is undersized, pressure can continue building against the foundation wall. Similarly, seepage blamed on a damaged board may actually come from an unsealed wall penetration.
Check whether the reviewer describes the complete system, including the membrane, board, drain pipe, aggregate, discharge point, and backfill. A Warehouse Full’s product information explains that drainage board serves as a protection and drainage layer, not a replacement for primary waterproofing or a planned discharge system.
Compare Reviews With Flow-Rate, Strength, and Puncture Tests
Reviews can show how a product behaves on a job site, while technical testing lets you compare products under consistent conditions. Check the manufacturer’s data for drainage capacity, compressive strength, puncture resistance, tensile strength, and the conditions used for each test.
Drainage capacity may change when soil pressure compresses the board. A product that performs well without a load may produce different results after backfill. Likewise, a high puncture-resistance rating does not guarantee protection if installers use the wrong fasteners or place sharp rock directly against the board.
Look for complete test information rather than one impressive number. The data should identify the product model, test method, loading conditions, and whether the measurement applies to the board alone or the board with filter fabric. Then compare the results with your soil type, wall depth, and groundwater conditions.
Check Warranty Coverage and Installation Exclusions
Read the warranty before choosing a drainage board. Confirm the coverage period, remedy for a defective product, claim process, proof-of-purchase requirements, and whether the warranty covers materials only or includes labor. A product warranty rarely covers every cause of foundation moisture.
Pay close attention to exclusions involving improper storage, incorrect fasteners, incompatible membranes, exposed edges, unapproved backfill, punctures, alterations, or installation by an unqualified contractor. Some warranties may also require a functioning footing drain and suitable discharge route.
Ask the supplier or installer to identify the exact warranty for the model being quoted. Product families may include different thicknesses, core profiles, fabrics, and accessories, with requirements that vary by model. Keep the invoice, product label, installation records, photographs, and inspection notes in case you need to submit a claim.
Evaluate Footing-Drain Performance Alongside the Board
A drainage board cannot remove water by itself. It collects moisture along the foundation wall and directs it to the footing drain. The drain must remain open, properly connected, and able to carry water to a sump, daylight outlet, or another approved discharge point.
When reading reviews, look for information about drain performance after heavy rain. Did water reach the outlet? Did the system back up? Were cleanouts available? Did the homeowner observe standing water near the foundation? These details can reveal whether the complete system works under real conditions.
For Central Texas properties, also consider surface runoff. Gutters, downspouts, grading, and landscape drainage can send large amounts of water toward a foundation during storms. A well-maintained gutter and drainage system from TX Gutter Solutions helps direct roof runoff away from vulnerable areas, complementing below-grade drainage rather than replacing it.
How Can Central Texas Homeowners Maintain Drainage Boards and Runoff Systems?
A drainage board works as one part of a larger foundation water-management system. It creates a path for water beside the foundation wall, while a waterproofing membrane limits water entry and a footing drain carries collected water away. If any part of that system becomes blocked, damaged, or disconnected, water may continue collecting against the foundation.
Homeowners can inspect the areas they can safely reach, especially after heavy rain, but avoid digging around the foundation without a clear plan. Look for standing water, changes in soil height, damaged downspouts, damp interior walls, or new cracks. The International Residential Code requirements for foundation drainage provide useful background on foundation drains and discharge systems.
Routine gutter and drainage maintenance is just as important as below-grade protection. Roof runoff that falls beside the foundation can saturate Central Texas clay, overwhelm a footing-drain system, and contribute to soil movement around the home. A practical inspection should cover exposed drainage-board components, footing-drain outlets, gutters, downspouts, grading, and landscape drainage features.
Inspect Exposed Edges, Terminations, Outlets, and Cleanouts
Most of a drainage board remains below grade, so homeowners may only see its upper edge, termination, outlet, or cleanout. Check these visible areas for loose components, gaps, crushed sections, soil buildup, or damage from landscaping work. A drainage board’s dimpled core creates a small channel beside the foundation wall, and that channel needs a clear route toward the footing drain.
Do not pull back soil or remove protective materials just to inspect the full board. Instead, photograph anything that looks displaced or exposed, then ask a waterproofing professional to assess it. Pay close attention to areas near decks, patios, irrigation lines, fences, and recent utility work, where the system may have been disturbed.
Keep cleanouts and discharge points accessible. Grass, mulch, gravel, and stored items should not cover them. TX Gutter Solutions provides gutter and drainage services for homeowners throughout Central Texas.
Check Footing-Drain Discharge After Heavy Rain
After a strong storm, inspect the footing-drain discharge point if your system has an accessible outlet. Water should leave the system without backing up, pooling against the foundation, or eroding the soil around the outlet. Foundation drains collect water near the footing and send it to daylight, a storm system, or a sump pump, depending on the property’s design.
Never block an outlet because it looks untidy, and do not redirect discharge toward a neighbor’s property or a walkway. If the outlet produces no flow during a storm, that does not automatically prove the drain is clogged, since soil conditions and rainfall intensity affect how much water reaches it. However, slow discharge, repeated pooling, or wet foundation walls deserve attention.
Check sump systems for power, pump operation, and a secure discharge line. The Waterproofing Magazine guide to footing drains explains how foundation drains collect and redirect water near the foundation.
Watch for Clogs, Punctures, Settlement, Seepage, and Water Intrusion
Watch for signs that water is not moving through the intended drainage path. Common warning signs include standing water near the foundation, soil that stays saturated, settled backfill, damp basement or interior walls, musty odors, efflorescence, and water entering through cracks or wall joints.
Drainage boards with filter fabric allow water to pass while helping keep soil particles out of the drainage channel. Over time, sediment, roots, construction debris, or poorly placed backfill can reduce flow. Excavation, fence installation, irrigation work, and landscaping can also puncture the board or waterproofing membrane.
Do not assume every foundation crack points to a drainage-board failure. Some cracks result from normal shrinkage, movement, or other structural conditions. Document when the issue appears, where it occurs, and whether it follows rain. A waterproofing or foundation professional can then determine whether the problem involves the board, membrane, footing drain, grading, or the structure itself.
Maintain Gutters, Leaf Guards, Downspouts, and Extensions
Roof runoff is one of the simplest parts of a foundation-protection system to maintain. Clean gutters at least twice a year, and inspect them more often if trees overhang the roof. Leaf guards can reduce debris, but they do not make a gutter system maintenance-free. Check for packed leaves, loose fasteners, sagging sections, separated seams, and water spilling over the front edge.
Downspouts should connect securely to the gutters and discharge well away from the foundation. Extensions must remain connected and open after mowing, landscaping, and heavy rain. If water repeatedly lands beside the foundation, consider a longer extension, a buried drain line, or another professionally designed drainage solution.
TX Gutter Solutions provides gutter cleaning and maintenance, along with gutter repairs, leaf protection, downspout work, and drainage solutions. Keeping roof water away from the foundation reduces the amount of runoff that the below-grade system must handle.
Control Runoff With Grading, Catch Basins, and Landscape Drainage
The soil around a home should direct surface water away from the foundation instead of holding it against the wall. Walk around the property after rain and look for low spots, ruts, mulch dams, or areas where water collects. Settlement near the foundation can create a reverse slope that sends runoff toward the wall.
Catch basins and channel drains can collect water from patios, driveways, and other hard surfaces. French drains, swales, and solid drain lines may help carry that water to an approved discharge point. Each solution needs the correct location, slope, pipe size, and outlet. Installing a drain without a working discharge route may simply move the water to another problem area.
Use caution when adding soil near the foundation. Covering siding, weep holes, vents, or drainage components can create new moisture problems. Before changing the grade or installing a buried system, have the site evaluated, particularly if the property has a significant slope or a history of standing water.
Account for Central Texas Clay, Rainfall, Slope, and Foundation Conditions
Central Texas properties can experience long dry periods followed by intense rainfall. Clay soil expands when it absorbs water and contracts as it dries, which can change how runoff moves around the home. Sloped lots may send water quickly toward lower sections of the foundation, while flat lots may hold water after storms.
These conditions make consistent water management important. Inspect the foundation perimeter for soil separation, erosion, settlement, and new low spots. Pay extra attention to corners, downhill walls, retaining walls, additions, garages, and areas where roof valleys concentrate runoff.
The right solution depends on the home’s foundation type, waterproofing system, soil, groundwater conditions, and drainage outlet. A drainage board that works well for one property may not suit another. Avoid choosing materials or excavation methods based on product labels alone, and ask a qualified professional to review the complete system before major work begins.
Get Help With Gutters, Downspouts, Drainage, and Maintenance From TX Gutter Solutions
Gutters and downspouts are the first line of defense against roof runoff, and small problems can place unnecessary pressure on foundation drainage. TX Gutter Solutions can inspect and maintain the visible parts of your water-management system, including gutters, downspouts, leaf guards, extensions, and related drainage features.
The company serves homeowners in Austin, Cedar Park, Leander, Round Rock, Georgetown, San Antonio, Bexar County, Dallas, Fort Worth, Plano, Frisco, Arlington, McKinney, and surrounding communities. Its service-area page provides more information about local coverage.
When requesting an inspection, describe where water collects, how long the problem has existed, and whether it appears only after heavy rainfall. Photos of overflowing gutters, eroded soil, disconnected extensions, or standing water can also help the technician understand the issue before arriving.
Call a Waterproofing or Excavation Specialist When Needed
Some drainage-board problems require access below grade, specialized testing, or excavation. Contact a waterproofing or excavation specialist if water enters the home, the foundation remains damp after storms, the soil has settled significantly, or you suspect a crushed footing drain, damaged membrane, blocked outlet, or displaced board.
Get professional help before excavating near the foundation, especially when buried utilities, gas lines, irrigation, retaining walls, or structural footings may be nearby. A specialist can identify the source of water, confirm whether the drainage path is open, and recommend repairs that address the entire system.
For serious or recurring water intrusion, request a written scope that separates excavation, waterproofing, drainage-board replacement, footing-drain work, backfill, and surface restoration. If the problem involves structural movement, coordinate with a qualified foundation professional as well as a waterproofing contractor. You can contact TX Gutter Solutions through its online request form for help with above-grade gutters, downspouts, runoff control, and related maintenance.
Frequently Asked Questions
What is the main purpose of a drainage board?
A drainage board creates a channel for groundwater to travel down the outside of a foundation wall toward a footing drain, sump system, or approved outlet. It also helps shield the waterproofing membrane from rocks, soil, and backfill equipment.
Can a drainage board replace foundation waterproofing?
No. The board manages water beside the wall, while the waterproofing membrane helps prevent moisture from entering the foundation. The system also needs a working footing drain and a reliable discharge point. Cracks, damaged membranes, and blocked drains require separate repairs.
How do I choose the right drainage board?
Consider the foundation type, soil, groundwater exposure, wall depth, backfill pressure, and existing waterproofing system. Compare drainage capacity, compressive strength, puncture resistance, filter fabric, compatibility, and installation requirements. A waterproofing professional can help match the product to the property.
Is drainage board installation a suitable DIY project?
It can involve excavation beside the foundation, utility risks, membrane repairs, drain connections, and backfilling. Professional installation is usually the safer choice, especially for existing homes, deep excavations, structural cracks, persistent leaks, or expansive Central Texas clay.
How can homeowners protect a drainage board after installation?
Keep gutters clear, make sure downspouts discharge away from the foundation, maintain the intended soil grade, and keep outlets and cleanouts accessible. Watch for standing water, damp walls, settled soil, or damaged landscaping. If problems continue, have the waterproofing and drainage system inspected rather than replacing the board alone.