
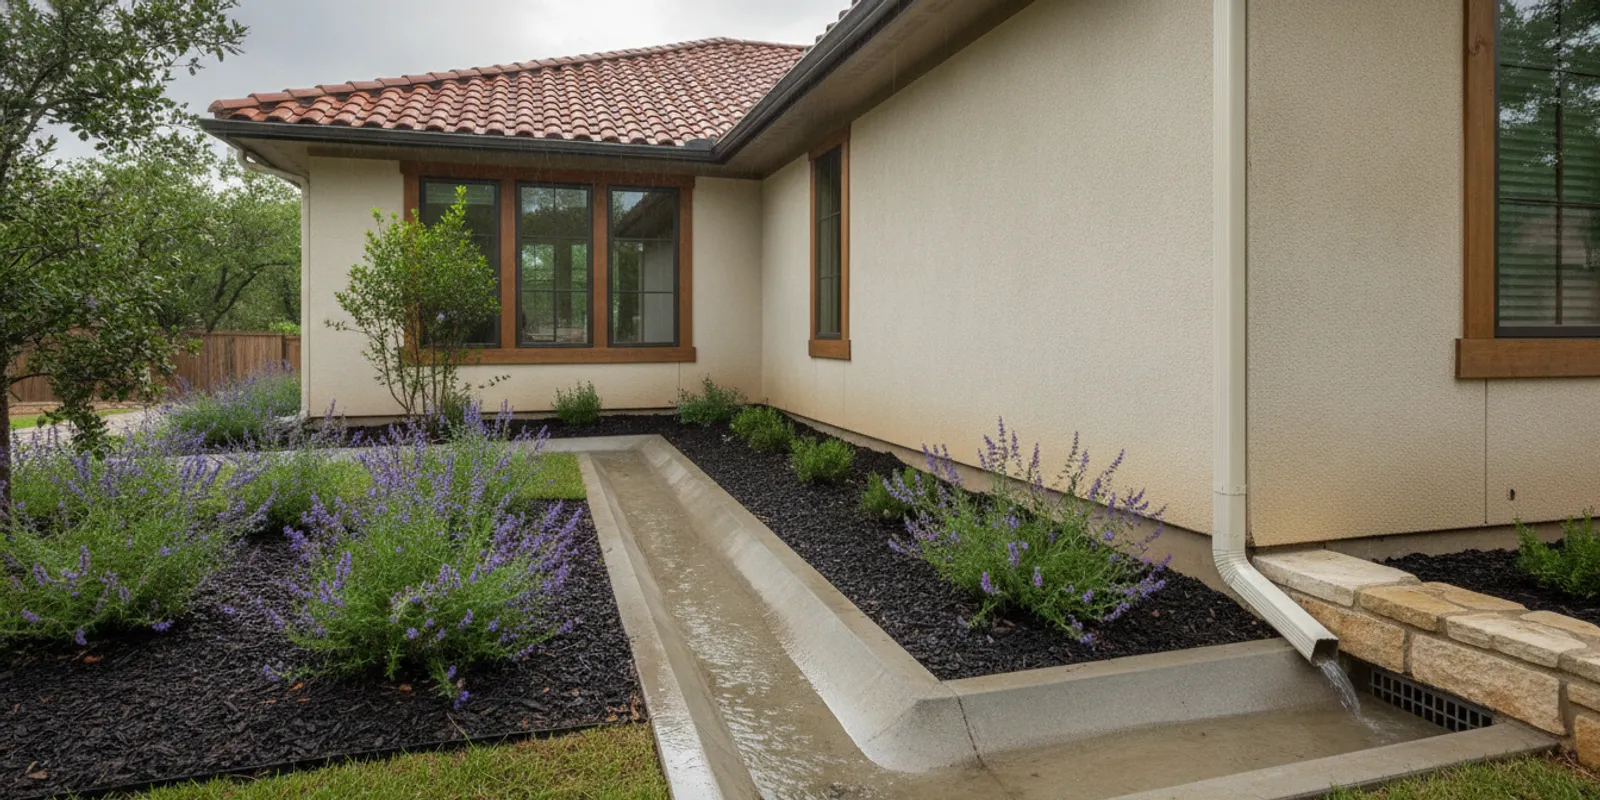
A concrete drainage channel can move surface water across a property when runoff needs a defined path. But the channel is only one part of the water route: the slope, inlet, outlet, surrounding soil, and nearby structures all matter. This guide explains how to assess a possible channel, what choices affect its performance, and when to bring in a qualified professional.
Request a free estimate or consultation
What is a concrete drainage channel?
A concrete drainage channel is a formed route that collects or conveys water over the ground. It might be an open channel with visible concrete sides and bottom, a shallow swale, or a narrow channel drain covered by a grate. Those forms differ in how they collect flow, how they are cleaned, and where they fit. A concrete-lined open channel remains visible, while a grated channel drain sends collected water into a passage below the cover, often toward a pipe or other outlet. The phrase can also refer to a larger engineered channel that carries runoff from a broad area. These are not interchangeable designs, and the name alone does not determine which one is appropriate.
Concrete gives a channel a defined shape, but does not make water disappear or guarantee that it will flow correctly. If the bottom has a low spot, if debris blocks the inlet, or if the outlet ends in another wet area, the feature may fail to solve the underlying concern. It can even move the water problem to a new location. Think of the channel as one link in a continuous water path: water must enter, travel through the route, and reach a stable, suitable destination. Its material is only one part of that system.
When might a concrete channel be useful?
A defined route may be worth evaluating when water repeatedly travels across a hard surface or a narrow part of the yard and spreads where it is unwanted. Examples include runoff that crosses a driveway, water moving from a patio toward a garage, or a concentrated path along a slope. A shallow channel can guide flow more predictably than allowing it to wander across paving or loose soil. An open feature is also visible for inspection, so leaves and sediment may be easier to spot than in a buried line.
The trade-offs matter. An open channel occupies space, may affect walking or mowing, and needs to fit the landscape. A grate can create a flatter surface at a crossing, but it needs to be selected for the location, secured, and cleared of debris. A channel is not automatically the answer to every wet patch. Compacted soil, an irrigation leak, an incorrectly directed downspout, or a low area with no outlet can produce similar symptoms but require a different response. Trace the water from its source to the point where it becomes a problem before selecting a feature.
For a broad overview of water-related home services, see TX Gutter Solutions' gutter and exterior services. Do not assume that a listed drainage service includes every concrete channel design or concrete construction project. Describe the observed problem and ask which work is within the provider's scope. An assessment should identify the source and route rather than prescribe the same installation for every property.
How is a concrete channel different from a gutter or trench drain?
A roof gutter catches water at the eave and carries it toward a downspout. A ground channel handles water after it reaches the surface. A trench drain or channel drain is a linear inlet, commonly covered by a grate, that collects surface flow along its length and conveys it onward. A concrete swale is an open surface route and may not have a grate or enclosed pipe. These parts may connect, but they serve different stages of the water path.
A gutter that spills at one corner may need attention at the roofline, not a new channel across the yard. A downspout that releases water beside a building may need a planned discharge route. A drain across a driveway may collect flow already moving over the pavement. Ask where collection should occur, what route is feasible, and what outlet can accept the water. Concrete channel work is different from gutter installation. Homeowners can read about gutter installation and repair in Austin to understand the roof-edge portion of the system.
What should you observe before choosing a channel?
Watch the site during and after rainfall from a safe place. Note where water first appears, which direction it travels, and how long it continues after rain slows. Does it come from a downspout, cross a paved area, follow a slope, emerge from a hillside, or collect from several places? Mark the house, driveway, patio, downspouts, gates, low areas, property edges, and visible entry and exit points on a simple sketch. This helps distinguish a concentrated flow route from a puddle that forms in a depression.
Look for patterns over more than one rain if possible. Does the water follow the same line each time? Does it carry mulch, soil, leaves, or grit? Does standing water remain after nearby surfaces dry? Sediment deposits and washed soil can indicate where flow has traveled, but dampness near a wall can have multiple causes. Do not diagnose structural problems from a surface sign alone. If water enters the building, the ground changes rapidly, or you see movement or cracking, seek the right professional evaluation rather than assuming a channel is the only answer.
Check roof drainage from the ground. Visible sagging, disconnected downspouts, spill marks below eaves, or debris at an accessible outlet may help explain where water starts. Do not climb an unsecured ladder to inspect gutters. A gutter inspection checklist can help organize visible observations safely. Record what you see and when it occurs, rather than guessing about hidden conditions.
How do you plan the route and outlet?
Plan the complete water journey before choosing the channel shape. Water starts in a contributing area, reaches an inlet or collection point, follows a grade, and ends at an outlet. If one segment is missing, it may back up, pass around the channel, erode the edge, or collect in a new location. An outlet may be a designated connection or another approved discharge point, but the right choice depends on the property and local rules. The outlet is not a minor detail to decide after the concrete is poured.
Sketch the route and mark doors, steps, walls, utilities, property boundaries, trees, walkways, driveways, and existing drains. Consider where people walk and where vehicles or maintenance equipment travel. A channel across a walking route needs a safe transition. A channel near a vehicle path needs an assembly designed for the expected loading; a decorative cover should not be assumed suitable. A grate also needs to sit securely and remain accessible for cleaning. If the route is narrow or close to a building, identify how construction and later inspection can be done safely.
Confirm that the outlet will not send concentrated flow toward a neighbor, public walkway, building, or unstable area. Easements, municipal requirements, utility locations, and stormwater rules may affect the plan. Requirements vary by location and by connection type, so contact the appropriate authority or a qualified drainage professional if the rules are unclear. Do not improvise a connection to a storm drain or direct runoff across a property line. For a buried route, consider how it can be inspected and cleared, and make sure the discharge point is suitable rather than simply out of sight.
What does clay soil change?
Clay soil can affect how water moves and how stable the ground is around a drainage feature. It may take up water more slowly than some other soils, and its behavior changes as moisture conditions change. Do not plan on the assumption that water will soak into the ground wherever the channel releases it. A discharge point that works in one part of a yard may leave standing water or send flow across the surface elsewhere. Evaluate the actual site and the outlet rather than relying on a broad soil label.
Clay does not provide a shortcut to the correct channel dimensions or slope. Fill, compaction, prior construction, planting beds, and paving all alter local conditions. Ground movement can also affect concrete support. A poorly supported channel may settle or crack, but not every crack indicates a major concern. Base preparation, joints, reinforcement where specified, and transitions should be appropriate to the site. Do not copy dimensions from an online photograph or a neighbor's installation. A concrete feature can be durable when it is designed and supported for its purpose, but it is not immune to movement.
Where flow is forceful, the contributing area is large, or the outlet is uncertain, a site-specific professional may need to assess grade, soil, expected flow, and discharge together. Do not size a channel only by measuring its visible width. A small roof or paved area can concentrate water at a narrow point, and other surfaces may add flow during rain. If the receiving point is nearly level or higher than the collection area, ask how the design will move water and what upkeep it needs. Soil conditions should be part of the design discussion, not the whole diagnosis.
What choices affect the channel design?
Open or covered: An open channel is easy to see and clear but occupies visible space and may create a walking or mowing concern. A grated channel provides a flatter crossing, but the grate and body must suit the location and remain clear of leaves, seeds, and sediment. Decide based on access, debris, safety, and expected loads.
Location and size: The channel should intercept water where it actually travels, not merely where it is easiest to build. Width and depth depend on the intended flow, site geometry, and outlet. Too small a channel may overtop; a larger channel can still fail if its route is wrong. Design dimensions should be selected for actual conditions rather than copied from a general example.
Grade and transitions: The bottom needs a deliberate route toward the outlet. Unintended dips can hold water and sediment. An abrupt drop or poorly directed exit can erode soil at the end. The suitable grade depends on flow and site conditions, so accuracy matters. Edges should meet adjacent soil or paving in a way that limits bypass flow and washout. Walkway transitions should not create an awkward or unstable step.
Concrete and joints: Mix, base preparation, reinforcement, thickness, and joint placement are chosen for the use and conditions. Concrete can crack if support or movement is not addressed. Joints and transitions are not cosmetic details to guess at. For a channel carrying substantial flow or regular loads, rely on a qualified installer or design professional instead of treating a general diagram as an installation specification.
Inlet and outlet: Water needs to enter without spilling around the channel and leave without undermining the end. A downspout adapter, pavement inlet, grate, or pipe should match how water arrives and where it goes next. Debris often gathers at a narrowing or turn. Include access to inspect and clean hidden connections. Ask how excess flow behaves if the inlet or outlet is blocked or if water exceeds the intended capacity.
How does a channel fit with roof runoff?
Roof runoff and surface runoff are related but not identical. Gutters collect water at the eaves, and downspouts concentrate it at particular points. If a downspout empties into a channel, the channel and outlet must be planned for that input. Connecting a downspout without checking capacity can add more water than the route is designed to handle. If roof runoff is not the source of the surface flow, connecting it may complicate rather than improve the plan.
Inspect the route from roof edge to discharge. Note whether downspouts are connected and where they release. A channel is not a repair for loose, blocked, or poorly directed roof drainage. Replacing gutters will not necessarily solve a low spot or a flow path across a driveway. Treat collection and conveyance as connected steps that may need separate work. For a look at the roofline side of the system, see how seamless gutters are installed.
What happens during assessment and construction?
A useful assessment starts with the site and the observed problem, not a predetermined product. The professional should ask where water originates, when it appears, what happens after rain, and what changes have already been made. They may inspect grades, paving edges, downspouts, potential outlets, and access for construction. If the flow or site complexity warrants it, additional design input may be appropriate before the work is specified.
Before excavation, utility locations and approvals need attention. The route should be marked and checked for conflicts rather than inferred from surface features. A shallow project is not automatically clear of buried utilities. Ask who is responsible for utility locating and confirming applicable permits or approvals. Construction may involve preparing the route and base, forming or placing the channel, creating a controlled grade, connecting the inlet and outlet, and finishing adjacent surfaces. This is a general overview, not a construction plan: soil, loading, concrete, reinforcement, and outlet conditions affect the details.
Before agreeing to a scope, ask what the channel will collect, where it discharges, what happens during flow beyond its intended capacity, and how it can be cleaned. Clarify whether related gutter, downspout, grading, concrete, and outlet work is included or excluded. Ask what site conditions could change the plan and who to contact if water ponds or erodes the outlet. Clear scope avoids assuming that a concrete feature includes every part of yard drainage.
After the work, a controlled check may confirm that water enters and travels through the route as intended. The test should not create a hazard or discharge water somewhere inappropriate. Observe the area during a later rain as well. Look for bypass flow, standing water, sediment, movement at edges, and erosion at the outlet. Take notes and photos to show a contractor if something changes.
Can you build a concrete channel yourself?
A small, low-risk surface feature can appear simple, but a working channel depends on more than pouring a trough. It needs a deliberate grade, sound support, secure transitions, and a suitable outlet. DIY planning is most reasonable when the source and discharge are clear, the work is limited, and utilities, boundaries, and public drainage are not uncertain. Verify local requirements and locate utilities before digging. Do not direct runoff across a property line or improvise a storm-drain connection.
Get qualified guidance if the channel carries roof runoff, crosses a vehicle area, runs near a building, receives flow from a broad area, or has no clear outlet. Common problems include a low spot in the channel, an outlet set too high, inadequate base preparation, soil washing under an edge, an unsuitable grate, and no access for clearing debris. A dry-day appearance does not show how the system performs when water arrives. A site-specific assessment can prevent an ill-fitting feature from being built in concrete.
How do you maintain a concrete channel?
Inspect an open channel after significant rain and at intervals when leaves and debris collect. Remove leaves, twigs, sediment, and mulch that reduce the clear path. Check the inlet and outlet as well as the middle. A clear channel cannot work as intended if its opening or receiving point is blocked. For a grated system, clean below the cover as directed by the product or installer. Do not stand on a loose grate or remove one where doing so creates a hazard.
After rain, notice whether water bypasses an edge, remains in a low section, or gathers at the outlet. Look for shifted concrete, separation, exposed base, washed soil, a displaced grate, or sediment. A small imperfection alone does not prove failure, but a change in flow or repeated erosion deserves attention. Photograph the condition and note when it occurs. Keep the discharge point clear without changing its route unless the revised discharge is allowed and appropriate. If a problem returns quickly after clearing, investigate the blockage or system design.
Maintenance is also a chance to check nearby downspouts and gutters, since a disconnected section or debris can change where water reaches the yard. For an overview of where assistance may be available, see TX Gutter Solutions' service areas. A channel and roof drainage components should be considered together when one affects the other.
What warning signs call for a closer look?
Repeated overtopping, water escaping around the channel, persistent standing water, or soil washing away at the outlet can mean the inlet, grade, route, or discharge needs reassessment. A channel may be too small for the flow, the outlet may be blocked, or the ground may have shifted. Clearing visible debris is a sensible first check, but recurring symptoms after cleaning suggest a broader issue.
Look closely if a grate rocks, concrete shifts, edges separate, or water moves beneath the feature. Do not cover an eroding edge with soil or seal a crack without understanding the cause. A cosmetic patch can hide a symptom while water continues to undermine the surrounding material. If water reaches a doorway or foundation area repeatedly, document its source and path and seek an appropriate professional assessment. A channel may be part of the response, but it is not a guaranteed remedy for every water or structural concern.
How should you compare proposed solutions?
Compare the diagnosis and the complete water route, not only the visible material. One option may be an open channel; another may be correcting a downspout or using a grated inlet. Ask what source each recommendation addresses and what happens after water leaves the feature. A clear explanation should cover collection, intended capacity, grade, discharge, access for cleaning, and limitations. Ask whether people or vehicles will cross the channel and whether the selected assembly suits that use. Clarify the work included and excluded so gutter changes, grading, concrete, and outlet connections are not assumed.
No surface channel can promise to carry every possible flow without overtopping, and no system works if its outlet is obstructed or overwhelmed. Ask what maintenance is expected and what conditions merit a follow-up. If a design depends on a buried connection or hidden transition, ask how it can be checked. For a no-pressure discussion of water management, use the contact page to request an estimate or consultation. Explain what you observed and ask whether the needed work fits the company's services before assuming concrete channel construction is offered.
What should you document before requesting an assessment?
Write down when water appears, where it begins, which direction it travels, and where it ends. Note whether the route repeats after rain or changes with the rainfall. If you do not know the origin, say so rather than guessing. Wide photos can show the relationship between the building, paved surfaces, downspouts, and wet area; close views can show sediment, a blocked opening, or erosion. Take photos from stable ground, not from flowing water or an unsecured ladder. If safe, a view during rainfall can help show direction, and a later view can show whether water remains.
Make a rough sketch and mark the property edge if known, plus gates, trees, utilities, walks, driveways, and existing drains. Note earlier changes, such as a downspout extension, gutter repair, landscaping, or paving work, and whether the symptoms changed afterward. Keep prior drawings or written scopes available. Do not dig test holes or probe for buried lines. If exact elevations or a formal site plan are needed, let the professional explain what information is appropriate and how to obtain it safely.
How do common site situations change the decision?
Water crosses a driveway: A grated channel may intercept surface flow, but its location must match the water's direction and its outlet must be planned. If a downspout contributes, assess roof discharge as well. A grate on a vehicle route needs to be suitable for expected loading and securely installed.
Water follows a side yard: A shallow channel may look convenient, but narrow spaces can have limited fall and access. Check where water can leave safely. Avoid sending runoff to an adjacent property or creating a path that cannot be cleared. Note whether flow comes from roof or yard.
Water gathers by a patio or doorway: Determine whether the paving slopes toward the building, an inlet is blocked, or water arrives from a larger area. A channel at the low edge may collect some surface flow but cannot correct every grade or building-envelope concern. Water entering indoors calls for a qualified inspection.
Water exits a downspout onto soil: Trace it across the ground. A short splash zone, a long flow line, and a persistent wet area suggest different conditions. The remedy might relate to the downspout, surface grading, or a separate drainage feature. Do not add a channel until its outlet is known.
The yard has little visible fall: Concrete does not make water move uphill. If there is no workable grade or receiving point, a professional needs to explain feasible options and their upkeep. Pumped systems, if considered, have power and maintenance needs of their own.
These situations are starting points rather than design instructions. Properties with similar puddles can have different contributing areas, soil, elevations, and allowed outlets. A recommendation should explain the observed cause, collection point, route, and destination. If one of those remains uncertain, ask what further evaluation is needed before construction.
Frequently asked questions
Is a concrete drainage channel the same as a French drain?
No. A concrete channel generally carries water visibly along a surface. A French drain is usually a buried feature that collects and conveys water through gravel and a pipe. They address different conditions, so identify whether water flows across the surface or collects below grade before comparing options.
Should a channel be open or covered?
It depends on location and use. An open channel is visible and easy to clean but occupies space and may affect walking. A grated channel may suit a crossing, provided the grate is secure, suitable for the loads, and maintained. Consider debris, access, and safety.
Will a concrete channel solve standing water in clay soil?
Not by itself. It may carry runoff toward a suitable outlet, but clay, low grade, concentrated roof runoff, compaction, or a blocked discharge may contribute. If water is sent to another low area, the problem may simply move. Assess source, route, and outlet together.
Can a downspout connect to a concrete channel?
Possibly, if the channel and outlet are designed for that additional flow and the discharge is appropriate. A downspout concentrates water, so confirm capacity, connection, route, and outlet with a qualified installer.
How often should a concrete channel be cleaned?
Inspect it regularly and after significant rain, with more frequent attention where leaves or sediment collect. Clear the inlet and outlet as well as the channel. If debris returns quickly or water backs up after cleaning, investigate the blockage or design.
Discuss your gutter and drainage concerns
The short version
A concrete drainage channel can guide surface runoff, but good performance depends on a complete water route. Identify the source, evaluate soil and grade, choose a safe path, confirm the outlet, and plan for inspection. When flow is substantial, the outlet is uncertain, or the channel is near a building or vehicle route, get a site-specific assessment. Tracing water from collection to discharge helps choose a solution that fits the property instead of simply relocating the problem.